Русский
How To Deploy a Telegram Bot
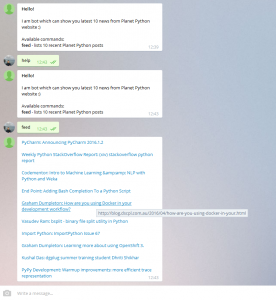
Part 1 — How To Create a Telegram Bot Using Python
This is the second part of my small tutorial about creating a Telegram bot using Python and Django. Today I am going to show you how to deploy our Django app on Digital Ocean VPS hosting, we are going to use Linux Ubuntu 14.04 LTS version.
What you are going to learn:
- How to deploy a django app (or any WSGI app) on Digital Ocean using SSH access
- How to work with gunicorn and nginx
- How to control your processes using supervisord
- Setting up virtualenv using pyenv
- Adding our app to system autorestart (init.d)
Even despite we are going to work with Django app, this instruction will be applicable for any Python WSGI web application, so do not hesitate to use it with Pyramid, Flask, Bottle or any other popular web application framework in Python ecosystem. In this post I am going to use VPS (Virtual Private Server) on popular Digital Ocean hosting. By the way, if you sign up using my link, you will get $10 credit instantly on your account, money can be used to buy small servers and use them for your own purposes.
Moreover, it is not neccessary to deploy your app on public servers, everything can be performed on your local ubuntu machine or with admin tools like VirtualBox or Vagrant (but in this case you will not be able to set up a webhook). Let's get started.
Creating a VPS
I assume that you already signed up on Digital Ocean. So, log in and then press Create Droplet at the very top.

Now we are going to choose the cheapest droplet for our purpose ($5 per month). Select Ubuntu 14.04.5 LTS or the newest one.
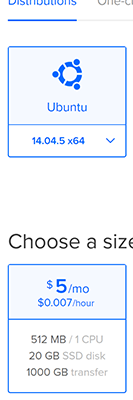
Scroll down and choose a data center. Usually I prefer Frankfunt due to lowest ping rate from my place. When everything is ready, press Create button. Your droplet (VPS) is going to be ready within 60 seconds, you will find remote access credentials on your mailbox.
Server Configuration
When server is ready, you have to log in and change your root password.
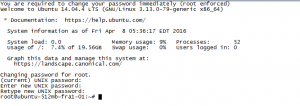
Let's update packages.
# apt-get update
# apt-get -y upgrade
And then create a sudo user.
# adduser django
# adduser django sudo
When sudo user has been added, log in under this user called django.
Let's now install packages that we are going to use for deployment.
$ sudo apt-get install -y build-essential
$ sudo apt-get install -y python-dev libreadline-dev libbz2-dev libssl-dev libsqlite3-dev libxslt1-dev libxml2-dev
$ sudo apt-get install -y git
At the very beginning I have mentioned that we are going to use pyenv to install the latest Python version (I usually do not work with system python when it comes to custom scripts and web apps). If you do not know what is Pyenv and how to work with it, take a look at my post in Russian (will translate it ASAP).
$ pyenv install 2.7.13
Downloading Python-2.7.13.tgz...
-> https://www.python.org/ftp/python/2.7.13/Python-2.7.13.tgz
Installing Python-2.7.13...
Installed Python-2.7.13 to /home/django/.pyenv/versions/2.7.13
It takes some time to download, compile and install newest version of Python, please be patient :) Ubuntu 14.04 has Python 2.7.6 which is quite old and has some security problems with TLS and it does not support TLS 1.2.
Now we have to clone a repo. If you forgot the link, here it is.
$ cd ~
$ git clone https://github.com/adilkhash/planetpython_telegrambot.git
$ cd planetpython_telegrambot/
Configure isolated python virtual environment using pyenv.
$ pyenv virtualenv 2.7.13 telegram_bot
$ pyenv local telegram_bot
It is time to install dependencies using pip.
pip install -r requirements.txt
I have made some changes which are not covered in the previous post about Telegram bot. I moved some variable settings to .env file which is controlled by a reusable django app called django-envrion. Take a look at the changes.
Create .env file from .env-template file and then you have to provide your own credentials.
$ cd blog_telegram && mv .env-template .env && vi .env
You have to change DEBUG to False, put your Telegram bot token and provide additional hostname (if you have several host, they should be separated by comma).
ALLOWED_HOSTS=127.0.0.1,bot.khashtamov.com
Example shows that I have 2 hosts: loopback and additional subdomain host for telegram bot (which is going to be used to set up a web hook).
Setting up valid SSL certificate
In my last post about Telegram I have mentioned that there are 2 ways on how to interact with Telegram bot:
- Using getUpdates API call
- Setting up a webhook using setWebhook API method
Moreover, if you decide to use a webhook, you have to obtain a valid SSL certificate or create your own self-signed certificate using tools like OpenSSL. We are going to obtain a valid one using free service called Let's Encrypt. I have a Russian article which describes the process of issuing SSL certificate (will translate ASAP).
$ cd ~ && git clone https://github.com/letsencrypt/letsencrypt
$ cd letsencrypt/
$ ./letsencrypt-auto certonly --standalone -d bot.khashtamov.com
You have to answer some questions regarding a website and when everything is ready, your fresh certificate will be located at /etc/letsencrypt/live/bot.khashtamov.com/. Pay attention to "-d" option in letsencrypt-auto script, put your own domain name.
Setting up a webserver Nginx
It is time to set up a proxy webserver for our Django app. I decided to take nginx which is one of the most robust web servers and is considered as a best practice when it comes to deployment to production environment. Nginx will proxy all incomming requests to our application which is going to be served by WSGI server called Gunicorn. Let's take a look at the config file:
$ sudo apt-get install -y nginx<br>$ cd /etc/nginx/sites-available/<br>$ sudo nano telegram_bot.conftelegram_bot.conf content should be:
server {
        listen 80;
        listen 443 ssl;
        server_name bot.khashtamov.com;
        ssl_certificate /etc/letsencrypt/live/bot.khashtamov.com/fullchain.pem;
        ssl_certificate_key /etc/letsencrypt/live/bot.khashtamov.com/privkey.pem;
        location / {
            proxy_set_header Host $http_host;
            proxy_redirect off;
            proxy_set_header X-Forwarded-For $proxy_add_x_forwarded_for;
            proxy_set_header X-Real-IP $remote_addr;
            proxy_set_header X-Scheme $scheme;
            proxy_pass http://localhost:8001/;
    }
}
Do not forget to replace a hostname! Now we have to restart a server.
$ cd /etc/nginx/sites-enabled/
$ sudo ln -s ../sites-available/telegram_bot.conf telegram_bot.conf
$ sudo service nginx restart
What we just did?
- Provide a valid SSL certificate for our domain (bot.khashtamov.com)
- Set up a proxy. All incomming http requests will be proxied to localhost:8001 (where Gunicorn will be started)
- Provide additional HTTP headers (IP address, hostname, http schema etc.). If you want to know more, take a look at docs.
For test purposes and to make sure that everything is configured correctly, we can start django development server on 8001 port:
$ cd ~/planetpython_telegrambot/
$ python manage.py runserver 8001
Open a browser and navigate to your configured host
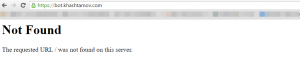
URL Not found error is OK because we only have 1 valid URL for our bot to receive commands (and django admin url of course).
Gunicorn and Supervisor set up
Now let's set up our production-ready WSGI server gunicorn which is going to be controlled by process manager supervisord.
What is Supervisor?
Supervisor is a process manager utility. It monitors processes and makes sure they work correctly. For example, if our gunicorn server dies supervisor tries to restart it and provides feedback. Pay attention that if you want to control a process via supervisor, make sure that your program is running in foreground mode.
Let's write a config file for gunicorn:
[program:gunicorn]
command=/home/django/.pyenv/versions/telegram_bot/bin/gunicorn blog_telegram.wsgi:application -b 127.0.0.1:8001 -w 1 --timeout=60 --graceful-timeout=60 --max-requests=1024
directory=/home/django/planetpython_telegrambot/
user=django
redirect_stderr=True
stdout_logfile=/tmp/gunicorn.log
stderr_logfile=/tmp/gunicorn_err.log
autostart=true
autorestart=true
startsecs=10
stopwaitsecs=10
priority=999
Save it as gunicorn.conf. We have already installed gunicorn via pip (it is our dependency in requirements.txt).
Our supervisord config file content:
[unix_http_server]
file=/tmp/telgram_bot_supervisord.sock
[supervisord]
logfile=/tmp/telgram_bot_supervisord.log
logfile_maxbytes=50MB
logfile_backups=10
loglevel=info
pidfile=/tmp/telgram_bot_supervisord.pid
nodaemon=false
minfds=1024
minprocs=200
[rpcinterface:supervisor]
supervisor.rpcinterface_factory = supervisor.rpcinterface:make_main_rpcinterface
[supervisorctl]
serverurl=unix:///tmp/telgram_bot_supervisord.sock
[include]
files = /home/django/planetpython_telegrambot/gunicorn.conf
Save it to ~/planetpython_telegrambot/supervisord.conf and start it via:
$ supervisord
If your settings are correct, there should be no error messages.
Supervisor is controlled by supervisorctl utility.
$ supervisorctl
gunicorn                         RUNNING   pid 20901, uptime 0:04:18
supervisor>
If you need help, then type:
supervisor> help stop
stop              Stop a process
stop :*          Stop all processes in a group
stop        Stop multiple processes or groups
stop all                Stop all processes
supervisor>
If supervisor is running, your telegram bot is already online.
Starting supervisor after system restart
What will happen if your VPS is restarted (failure inside data center, system update, admin error etc)? Nothing. Your web apps will not be restarted. We have to fix it.
We are going to use upstart init script.
description "Supervisor Telegram bot django app starting handler"
start on runlevel [2345]
stop on runlevel [!2345]
respawn
setuid django
setgid django
chdir /home/django/planetpython_telegrambot/
exec /home/django/.pyenv/versions/telegram_bot/bin/supervisord
You have to put your file (I called it telegram_bot.conf) to /etc/init/ directory. In order to check if it works, restart your droplet:
$ sudo shutdown -r nowEverything should work correctly.
Setting up Webhook
Order to initiate a webhook, we have to run a custom python script with the following content:
import telepot
bot_token = 'BOT_TOKEN'
bot = telepot.Bot(bot_token)
bot.setWebhook('https://bot.khashtamov.com/planet/bot/{bot_token}/'.format(bot_token=bot_token))
Please replace BOT_TOKEN to your valid telegram bot token and run:
$ python webhook.py
So now your bot should receive messages and process them correctly.