 Русский
Introduction to Apache Airflow
Apache Airflow is an advanced tool for building complex data pipelines, it is a swiss-knife for any data engineer. If you look at the open positions for data engineers, you will see that the experience with Apache Airflow is a must have.
Apache Airflow was created back in 2014 at Airbnb by Maxime Beauchemin, who is also the author of Apache Superset. Starting from January 2019 Airflow is a Top-Level project under the Apache Foundation.
The main idea of this post is to show you how to install Apache Airflow, describe its main concepts and build your first data pipeline using this wondeful tool. Let's dive into it.
DAG
Directed Acyclic Graph (DAG) is a core object in Apache Airflow which describes dependencies among your tasks.
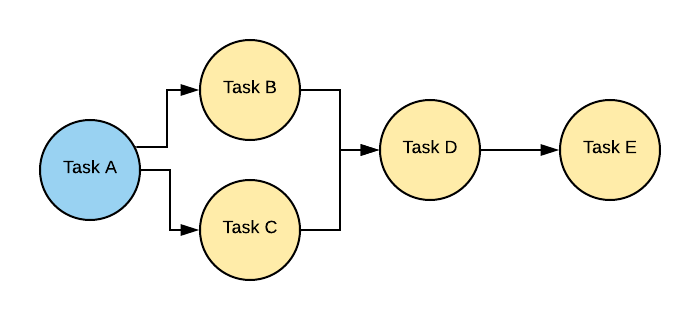
Arrows describe dependencies thus Tasks B & C depend on the completion of Task A and Task E depends on all tasks leftwards.
Operator
If you are familiar with Luigi, Operator is the same as Luigi Task. Look at the picture above, you see the chain of tasks, each task is an Operator. Apache Airflow has a rich set of Operators:
- PythonOperator — runs a python code via provided callable
- BashOperator — runs bash scripts
- PostgresOperator — runs SQL queries to a PostgreSQL database
- RedshiftToS3Transfer — runs Redshift UNLOAD to S3
- EmailOperator — sends emails
The full list of available operators you can find in the documentation.
Attention! Operator cannot get a return value from a previous Operator/Task as it is when you call a chain of functions because they can be executed in different processes and even physical nodes.
Sensor
Sensor is a subset of an Operator. If you create a task which should react to an event then Sensor is a right choice. Let's look what Airflow offers:
- PythonSensor — runs a function until it returns
True - S3Sensor — checks if an object exists in a S3 bucket
- RedisPubSubSensor — checks if a message landed in a pub-sub channel
- RedisKeySensor — checks if a key exists in Redis
If you want to build your own Sensor you have to inherit from BaseSensorOperator and redefine poke method.
Hook
Hooks are interfaces to external services like databases, HTTP APIs, Cloud services etc. They are building blocks for Operators in terms of communication with these services. If you have PostgresOperator in your pipeline it uses PostgresHook under the hood.
Installation
It is time to practice 💪 Apache Airflow consists of few parts:
- WebApp with the dashboard, written using Flask
- Scheduler, which is responsible for scheduling jobs/dags
- Worker, which executes code
Airflow needs a database, the best practice is to use PostgreSQL or MySQL in production. I recommend using PostgreSQL. I am not going to use Airflow docker container.
First we need to create a virtual environment and install Airflow package into it:
$ python3 -m venv .venv
$ source .venv/bin/activate
$ pip install apache-airflow
Apache Airflow has lots of dependencies in comparison to Luigi:
alembic==1.4.0
apache-airflow==1.10.9
apispec==1.3.3
argcomplete==1.11.1
attrs==19.3.0
Babel==2.8.0
cached-property==1.5.1
cattrs==0.9.0
certifi==2019.11.28
chardet==3.0.4
Click==7.0
colorama==0.4.3
colorlog==4.0.2
configparser==3.5.3
croniter==0.3.31
defusedxml==0.6.0
dill==0.3.1.1
docutils==0.16
Flask==1.1.1
Flask-Admin==1.5.4
Flask-AppBuilder==2.2.2
Flask-Babel==0.12.2
Flask-Caching==1.3.3
Flask-JWT-Extended==3.24.1
Flask-Login==0.4.1
Flask-OpenID==1.2.5
Flask-SQLAlchemy==2.4.1
flask-swagger==0.2.13
Flask-WTF==0.14.3
funcsigs==1.0.2
future==0.16.0
graphviz==0.13.2
gunicorn==19.10.0
idna==2.8
importlib-metadata==1.5.0
iso8601==0.1.12
itsdangerous==1.1.0
Jinja2==2.10.3
json-merge-patch==0.2
jsonschema==3.2.0
lazy-object-proxy==1.4.3
lockfile==0.12.2
Mako==1.1.1
Markdown==2.6.11
MarkupSafe==1.1.1
marshmallow==2.19.5
marshmallow-enum==1.5.1
marshmallow-sqlalchemy==0.22.2
numpy==1.18.1
pandas==0.25.3
pendulum==1.4.4
pkg-resources==0.0.0
prison==0.1.2
psutil==5.6.7
Pygments==2.5.2
PyJWT==1.7.1
pyrsistent==0.15.7
python-daemon==2.1.2
python-dateutil==2.8.1
python-editor==1.0.4
python3-openid==3.1.0
pytz==2019.3
pytzdata==2019.3
PyYAML==5.3
requests==2.22.0
setproctitle==1.1.10
six==1.14.0
SQLAlchemy==1.3.13
SQLAlchemy-JSONField==0.9.0
SQLAlchemy-Utils==0.36.1
tabulate==0.8.6
tenacity==4.12.0
termcolor==1.1.0
text-unidecode==1.2
thrift==0.13.0
typing==3.7.4.1
typing-extensions==3.7.4.1
tzlocal==1.5.1
unicodecsv==0.14.1
urllib3==1.25.8
Werkzeug==0.16.1
WTForms==2.2.1
zipp==2.2.0
zope.deprecation==4.4.0
After the installation venv will have airflow binary which can be executed. You can run it in order to check if everything is OK.
Configuration file for Airflow is called airflow.cfg. By default it is located in ~/airflow/airflow.cfg. You can change the location by redefining environment variable.
$ export AIRFLOW_HOME=~/airflow/
Now you should initialize a database:
$ airflow initdb
By default Airflow uses SQLite as a database, for production I would recommend to use PostgreSQL or MySQL. Let's use it. You have to install PostgreSQL on your local machine or use postgres docker image.
Create fresh database:
postgres=# create database airflow_metadata;
CREATE DATABASE
postgres=# CREATE USER airflow WITH password 'airflow';
CREATE ROLE
postgres=# grant all privileges on database airflow_metadata to airflow;
GRANT
Now we need to edit airflow.cfg, please find sql_alchemy_conn and set it to postgresql+psycopg2://airflow:airflow@localhost/airflow_metadata. Also please set load_examples = False, this option is responsible for loading unnecessary example DAGs, we do not need them.
Because we are using PostgreSQL, we need to install additional python package called psycopg2.
$ pip install psycopg2==2.8.4
And now let's initialize the database again:
$ airflow initdb
Airflow Executors
Let's dive into another important concept in Apache Airflow — Executor. It is responsible for how tasks are going to be executed. There are few ways:
- SequentialExecutor
- LocalExecutor
- CeleryExecutor
- DaskExecutor
- KubernetesExecutor
In production many people are using CeleryExecutor which is based on Celery task queue.
SequentialExecutor
By default Apache Airflow uses SequentialExecutor. This executor does not support parallel execution of tasks hence is not recommended in production.
LocalExecutor
Uses separate processes for parallel execution. But you cannot scale it horizontally and it is not fault-tolerant. If you don't have lots of tasks you can start with this type of Executor.
CeleryExecutor
One of the most popular Executor to use in production. It uses Celery task queue that is why it can be scaled horizontaly. Celery requires additional services like broker (Redis, RabbitMQ etc).
DaskExecutor
Similar to Celery but uses Dask and dask-distributed.
KubernetesExecutor
Relatively new type of executor which relies on Kubernetes cluster for task execution (tasks are runned in pods)
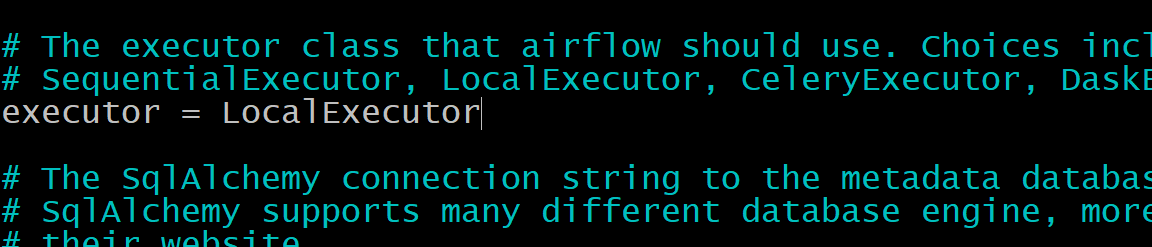
As I've stated above we should change SequentialExecutor to LocalExecutor. In order to do this we need to open airflow.cfg and find executor option:
Now we can run the webapp with UI dashboard:
$ airflow webserver -p 8080
If everything is OK, please navigate to http://localhost:8080 in your web browser:
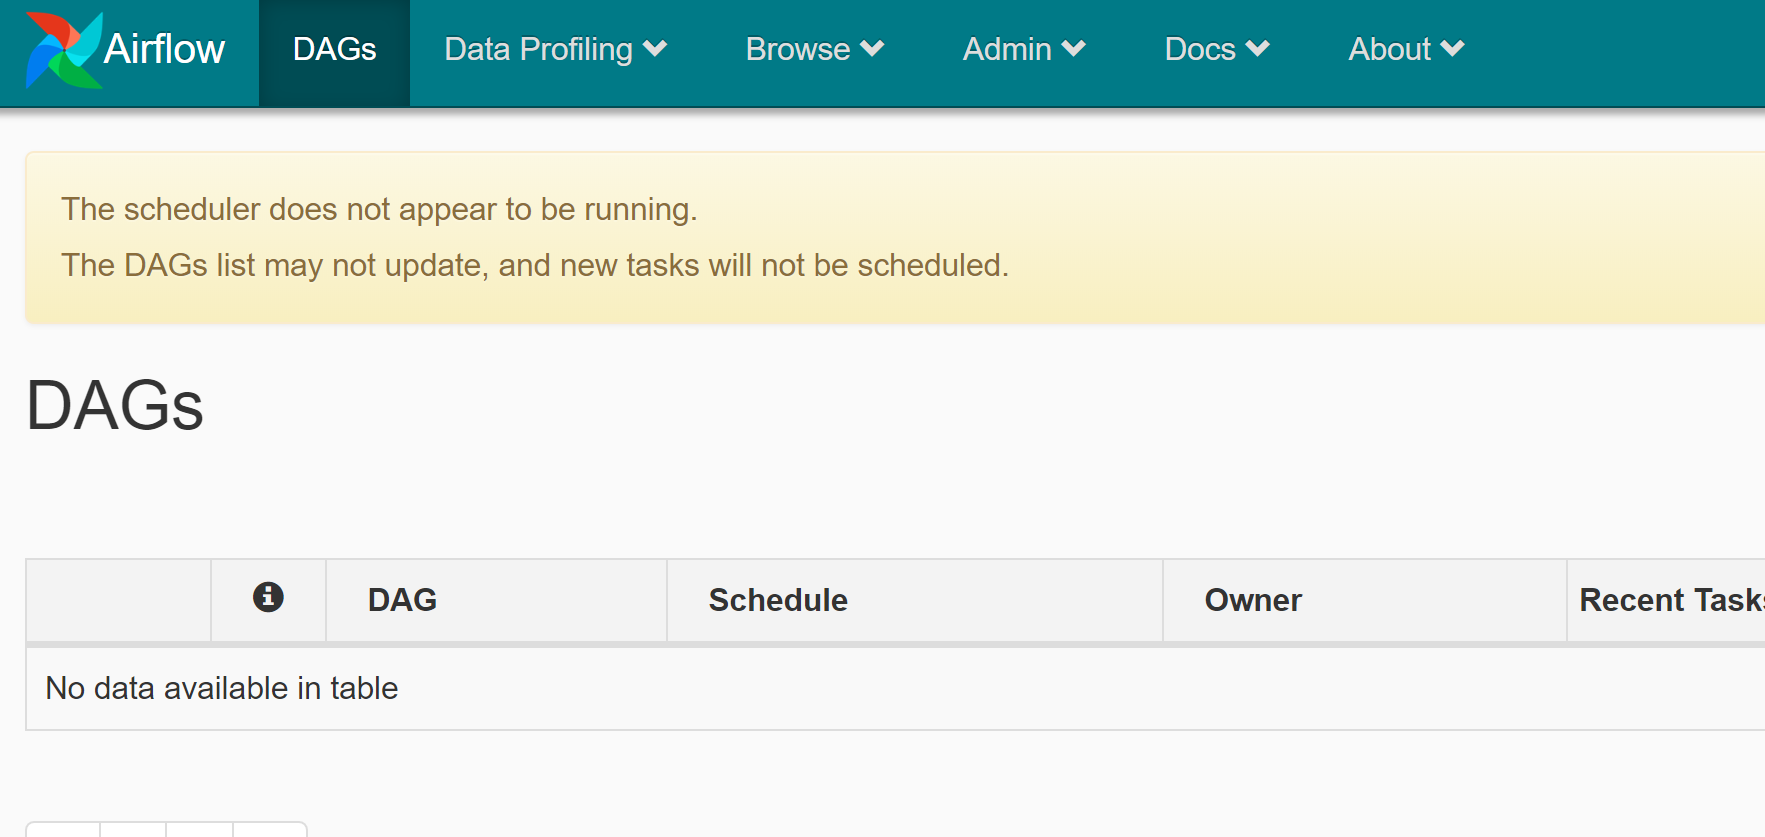
Congratulations! You have set up the Airflow.
The message in the orange box states that the scheduler is not running. It is responsible for DAGs discovery and their scheduling for running. Let's fix it:
$ airflow scheduler
Now everything is ready to dive into coding our first data pipeline in Python.
Building a Data Pipeline
If you explore the config file airflow.cfg you will find the option called dags_folder. This attribute corresponds to the path where your future DAGs will be located. By default it is $AIRFLOW_HOME/dags. Let's build our first pipeline. Our pipeline consists of 2 tasks:
- We need to download the Titanic dataset which was used in my pandas introduction post.
- Create a pivot table. We will group the dataset by gender and cabin class. As a result a new dataset will be created.

The source code of our simple DAG:
import os
import datetime as dt

import requests
import pandas as pd
from airflow.models import DAG
from airflow.operators.python_operator import PythonOperator

args = {
    'owner': 'airflow',
    'start_date': dt.datetime(2020, 2, 11),
    'retries': 1,
    'retry_delay': dt.timedelta(minutes=1),
    'depends_on_past': False,
}

FILENAME = os.path.join(os.path.expanduser('~'), 'titanic.csv')

def download_titanic_dataset():
    url = 'https://web.stanford.edu/class/archive/cs/cs109/cs109.1166/stuff/titanic.csv'
    response = requests.get(url, stream=True)
    response.raise_for_status()
    with open(FILENAME, 'w', encoding='utf-8') as f:
        for chunk in response.iter_lines():
            f.write('{}\n'.format(chunk.decode('utf-8')))

def pivot_dataset():
    titanic_df = pd.read_csv(FILENAME)
    pvt = titanic_df.pivot_table(
        index=['Sex'], columns=['Pclass'], values='Name', aggfunc='count'
    )
    df = pvt.reset_index()
    df.to_csv(os.path.join(os.path.expanduser('~'), 'titanic_pivot.csv'))

with DAG(dag_id='titanic_pivot', default_args=args, schedule_interval=None) as dag:
    create_titanic_dataset = PythonOperator(
        task_id='download_titanic_dataset',
        python_callable=download_titanic_dataset,
        dag=dag
    )
    pivot_titanic_dataset = PythonOperator(
        task_id='pivot_dataset',
        python_callable=pivot_dataset,
        dag=dag
    )
    create_titanic_dataset >> pivot_titanic_dataset
The DAG titanic_pivot consists of 2 PythonOperator instances: create_titanic_dataset and pivot_titanic_dataset. Take a look at how dependency among tasks is declared:
create_titanic_dataset >> pivot_titanic_dataset
Which means that pivot_titanic_dataset should be executed after the successful execution of create_titanic_dataset. Another way to declare dependencies is to invoke methods .set_upstream or .set_downstream
pivot_titanic_dataset.set_upstream(create_titanic_dataset)
# or
pivot_titanic_dataset << create_titanic_dataset
Also you can set additional options for your DAG in the code like number of retries in case of a failure, starting date, scheduling interval (in case of a recurring DAG) etc. There are lots of additional settings which could be found in the docs.
Now you have to save the code to $AIRFLOW_HOME/dags and start the scheduler (if you did not start it previously):
$ airflow scheduler
If you navigate your browser to http://localhost:8080 you should see your DAG in the dashboard:

In order to start the execution, you have to trigger the DAG from Off to On.
Conclusion
This post is just an introduction to the basics of Apache Airflow: its building blocks and concepts. In order to master it you have to play with it on your own. I hope my text helped you get comfortable to continue learning this tool. Cheers!
You can find the source code in the link.